Learning jQuery


When jQuery was new (back around 2006–10), it was mighty hard to use JavaScript to rewrite the DOM and get it working consistently in every browser. The jQuery library solved a ton of problems because, under the hood, it had JavaScript functions that took into account almost every bad browser thing that could ruin your day. By using jQuery objects and methods, you could rest easy and be confident that your interactive things would work as intended for just about everybody.

JavaScript has been improved since then, and ES6 JavaScript is far better than all the versions before. Browsers are better now too. Some people question whether we need jQuery at all anymore.

Well, 89.62 percent of the top 10,000 U.S. websites (“top” meaning most traffic) use jQuery today, according to BuiltWith. So you just can’t ignore it.

jQuery Resources

jQuery Cheat Sheet

To specify something, anything, in your HTML:

  • $('.blue') — everything that has a class of “blue”
  • $('#chocolate') — anything with the id “chocolate”
  • $('h2') — every h2 element

When you’ve specified something that way, you’ve created a jQuery object, which automatically has a ton of possible methods, as well as properties.

To apply a jQuery method, such as .hide(), to a jQuery object, such as $('.blue'):

$('.blue').hide();

That hides everything with a class of “blue.” Look up the methods using one of the resources linked above.

Event handlers — you’ll learn about these in any jQuery tutorial. Events are actions initiated by the user, such as scrolling, clicking, and moving the mouse. jQuery can be used to detect an event and then react to it.

Usually you will use event handlers (also called event listeners) together with methods.

Effects are a particular set of jQuery methods that show, hide, or move objects. Show/hide, fadeIn/fadeOut, and slideDown/slideUp are the effects that everyone learns first. They are basic jQuery! Combined with a button and an event handler, effects are used to build accordion menus and other UI elements.

jQuery Plugins

Often there is a jQuery plugin that has already been written and tested to solve a hard problem, such as how to handle scrolling events or how to make a “lightbox”–style slideshow. These useful plugins give us another reason to love jQuery.

A word of warning: Most jQuery plugins are not simple for a beginner. You have to spend time reading the documentation and learning how to use the plugin correctly.

Starting JavaScript!

js

This week, you will start learning JavaScript, the programming language that lets us add interactivity and more to web pages and apps. This is a handy list of resources:

JavaScript has been around since 1995, and random Googling by a beginner is likely to end in tears. There are so many old tutorials and so much outdated advice! You most definitely can learn to use JavaScript, but keep your focus on what is taught in this course and what is asked of you in the assignments. I have tried to streamline it for you.

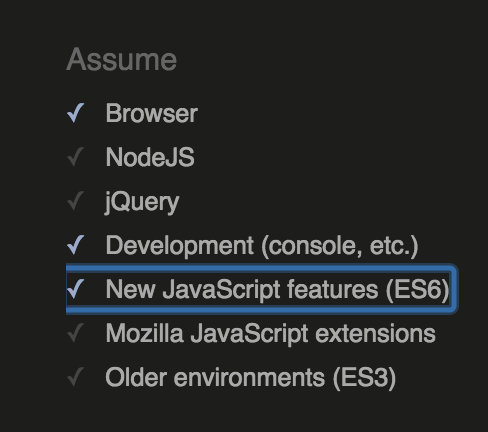
Note: If you use JSHint, make sure you click “Configure” at the top of the page and select “New JavaScript features (ES6).” Otherwise you will get an error every time you use the let keyword, or any template literal.

Screen Shot 2018-10-08 at 6.29.37 PM

CSS grid and CSS flexbox

This week we start to learn about CSS grid. Last week, we learned about CSS flex styles. There are certainly times when you will be puzzled about which of these two choices is the best one for a particular design problem you are facing.

A CSS grid layout has one huge difference from a CSS flex layout:

  1. When you choose grid, you want to arrange items in two directions, both rows and columns, inside a grid container.
  2. When you choose flex, you will work with only one row, OR one column, inside a flex container.

You will still scratch your head over this choice at times, so here are two wonderful, free resources that might help:

  • Grid by Example is a site with tons of examples of how to use grid layouts, with a handy visual arrangement that makes it easy to identify a pattern that might work for your design.
  • CSS Flexbox Examples includes a bunch of sample layouts for distinct situations, like a photo gallery.

Flex actually has far fewer options, because with flex we are only arranging one row of things, or one column of things. So check this out: A Complete Guide to Flexbox.

For fancy, artistic grid examples, see Web Design Experiments by Jen Simmons.

Observations from Assignment 3

Here are some things you need to think about and understand.

A CSS rule for body is a rule for most things

Several students had color: #000 for the body selector, and then later repeated color: #000 for other selectors such as article. This repetition is completely unnecessary. When you specify color in a rule for body, just about everything on the page will have that color. The same goes for background and font-family when declared in a rule for the body selector.

The only reason to include color in rules for selectors other than body is to change the color.

Avoid adding anything to your CSS that is not doing a job!

Elements: header, footer, article, aside, figure

Do we need a header element on every Web page? No. Do we need a footer element on every Web page? No.

When do we need them? When the structure of the document calls for them. Please try never to use any unnecessary tags or elements in HTML. If you have a simple single page — an invitation to an event, for example — it might have no header, no footer, no article, no aside, and no section — and it would be perfectly CORRECT.

Likewise for figure. On most pages, for most images, the simple img element alone will be just fine.

Use of comments in CSS

Many of you noticed a few comments I put into the CSS, like this:

/* add your pseudo classes below this line */

It’s very helpful for beginners to divide their CSS file with comments in this way, especially as the CSS gets more complex. I suggest you don’t go crazy and add too many comments, but a few — well placed — might really help you keep your CSS rules neatly organized. That can help you to avoid errors.

Use of comments in HTML

Of course, HTML has comments too. A few students went overboard with these. It’s good to write a comment if you think it will help you avoid a mistake later (if you come back to the file to copy some markup, for example). However, too many comments just clutter up the HTML, and they certainly do not look professional.

The link pseudo classes

The order of these in your CSS literally affects the way they work — in terms of whether users see the hover color, focus, active, etc. So it’s really important to get the order correct.

That said, most of the super-correct, standards-following Web designers today will write their CSS for links like this:

a {
    color: #2455c3;
    }
a:hover, a:focus {
    color: #487ffa;
    }

They style ALL anchors (the a element) one way, and then follow that rule with a change for only a:hover and a:focus. It is perfectly fine if you follow this example. But be sure to do it exactly as shown! You can add more declarations inside the curly braces, of course.

If you need to change link colors for part of a page — say, the footer — remember to use the selector in front of each a.

footer a {
    color: #2455c3;
    }
footer a:hover, footer a:focus {
    color: #487ffa;
    }

Double selectors are bad

What I mean by “double selectors” is that you wrote two separate rules for ONE selector. Say you have body at the top of your CSS, followed by a few declarations like background, color and font-family. That’s one rule for body. Then you have rules for article, aside, and some other selectors. And THEN you have body AGAIN. That is not a good idea.

Check your CSS carefully and organize it logically.

Soon you’ll see that we might create a rule for, say, the p element and later write another rule for p.special or aside p. That’s not the same as the bad double selector because p with a class, such as .special, and p as a descendant of aside are subsets — those selectors would affect some p elements but not all of them.